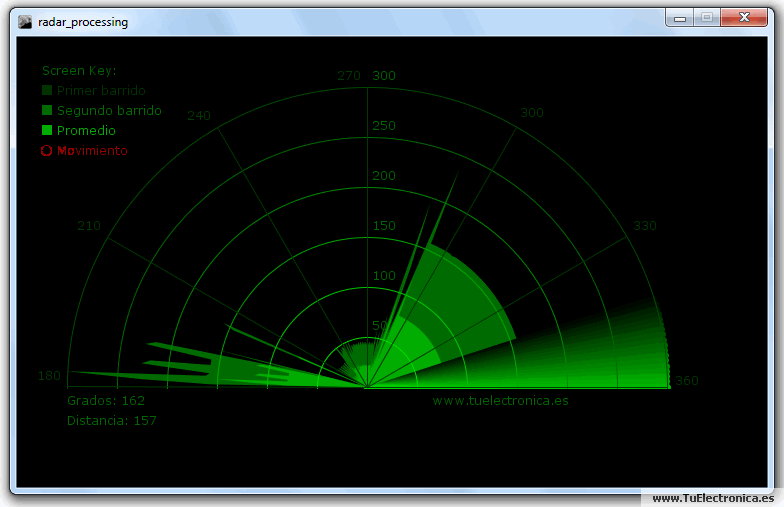
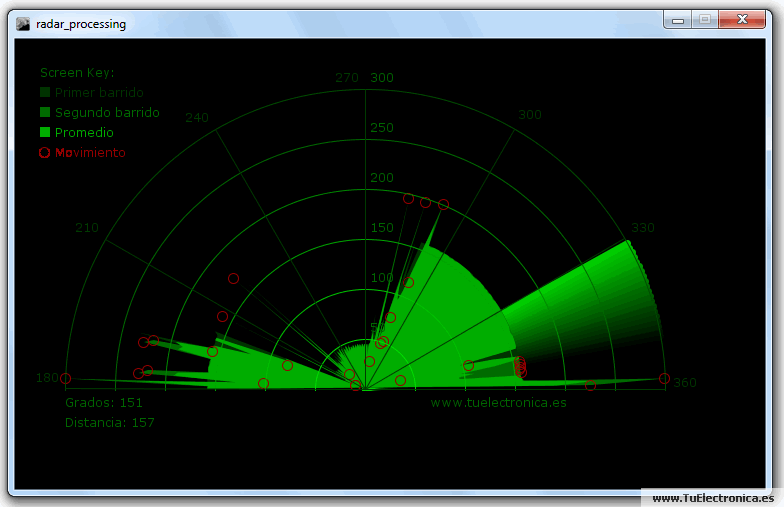
 En este primer tutorial de Processing crearemos un entorno visual para usarlo con nuestro sonar Arduino de artículos anteriores. Con un barrido de 180° podremos medir la distancia de un área y visualizar si se producen cambios.
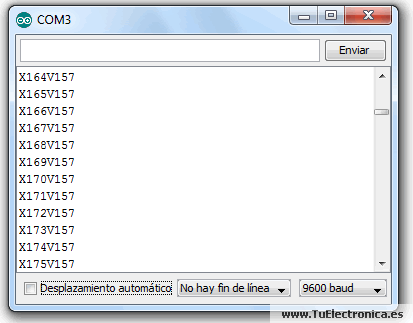
Debemos tener conectado Arduino a nuestro PC mediante el cable USB y cargado con el código del tutorial Sonar con Arduino. Arduino nos envía una serie de parámetros por el puerto serie que Processing debe descomponer e interpretar. Estos parámetros son XgradosVvalor, donde grados y valor son datos numéricos.

/* Autor: luckylarry.co.uk Radar Screen Visualisation for SRF-05 Maps out an area of what the SRF-05 sees from a top down view. Takes and displays 2 readings, one left to right and one right to left. Displays an average of the 2 readings Displays motion alert if there is a large difference between the 2 values. */ import processing.serial.*; // Importa la libreria serie Serial myPort; // Declara el puerto serie float x, y; // Variable para almacenar las coordenadas int radius = 350; // Establece el radio de los objetos int w = 300; // Establece un valor de anchura arbitraria int degree = 0; // Varible para la posición del servo en grados int value = 0; // Variable para el valor del sensor int motion = 0; // Variable para indicar el sentido del barrido del servo int[] newValue = new int[181]; // Matriz para almacenar cada valor nuevo de cada posición del servo int[] oldValue = new int[181]; // Matriz para almacenar cada valor previo de cada posición del servo PFont myFont; // Variable para configuración de fuente int radarDist = 0; // set value to configure Radar distance labels int firstRun = 0; // value to ignore triggering motion on the first 2 servo sweeps int lf = 10; // ASCII retorno de carro void setup(){ size(750, 450); // Establece el tamaño de la ventana background (0); // Establece a negro del fondo de la ventana myFont = createFont("verdana", 12); // Parametros de la fuente textFont(myFont); // Establece los parametros de la fuente println(Serial.list()); // Lista todos los puertos series myPort = new Serial(this, Serial.list()[1], 9600); // Establece un puerto serie myPort.bufferUntil(lf); // Almacena en el bufer hasta llegar un retorno de carro } /* draw the screen */ void draw(){ fill(0); // set the following shapes to be black noStroke(); // set the following shapes to have no outline ellipse(radius, radius, 750, 750); // draw a circle with a width/ height = 750 with its center position (x and y) set by the radius rectMode(CENTER); // set the following rectangle to be drawn around its center rect(350,402,800,100); // draw rectangle (x, y, width, height) if (degree >= 179) { // if at the far right then set motion = 1/ true we're about to go right to left motion = 1; // this changes the animation to run right to left } if (degree <= 1) { // if servo at 0 degrees then we're about to go left to right motion = 0; // this sets the animation to run left to right } /* setup the radar sweep */ /* We use trigonmetry to create points around a circle. So the radius plus the cosine of the servo position converted to radians Since radians 0 start at 90 degrees we add 180 to make it start from the left Adding +1 (i) each time through the loops to move 1 degree matching the one degree of servo movement cos is for the x left to right value and sin calculates the y value since its a circle we plot our lines and vertices around the start point for everything will always be the center. */ strokeWeight(7); // set the thickness of the lines if (motion == 0) { // if going left to right for (int i = 0; i <= 20; i++) { // draw 20 lines with fading colour each 1 degree further round than the last stroke(0, (10*i), 0); // set the stroke colour (Red, Green, Blue) base it on the the value of i line(radius, radius, radius + cos(radians(degree+(180+i)))*w, radius + sin(radians(degree+(180+i)))*w); // line(start x, start y, end x, end y) } } else { // if going right to left for (int i = 20; i >= 0; i--) { // draw 20 lines with fading colour stroke(0,200-(10*i), 0); // using standard RGB values, each between 0 and 255 line(radius, radius, radius + cos(radians(degree+(180+i)))*w, radius + sin(radians(degree+(180+i)))*w); } } /* Setup the shapes made from the sensor values */ noStroke(); // no outline /* first sweep */ fill(0,50,0); // set the fill colour of the shape (Red, Green, Blue) beginShape(); // start drawing shape for (int i = 0; i < 180; i++) { // for each degree in the array x = radius + cos(radians((180+i)))*((oldValue[i])); // create x coordinate y = radius + sin(radians((180+i)))*((oldValue[i])); // create y coordinate vertex(x, y); // plot vertices } endShape(); // end shape /* second sweep */ fill(0,110,0); beginShape(); for (int i = 0; i < 180; i++) { x = radius + cos(radians((180+i)))*(newValue[i]); y = radius + sin(radians((180+i)))*(newValue[i]); vertex(x, y); } endShape(); /* average */ fill(0,170,0); beginShape(); for (int i = 0; i < 180; i++) { x = radius + cos(radians((180+i)))*((newValue[i]+oldValue[i])/2); // create average y = radius + sin(radians((180+i)))*((newValue[i]+oldValue[i])/2); vertex(x, y); } endShape(); /* if after first 2 sweeps, highlight motion with red circle*/ if (firstRun >= 360) { stroke(150,0,0); strokeWeight(1); noFill(); for (int i = 0; i < 180; i++) { if (oldValue[i] - newValue[i] > 35 || newValue[i] - oldValue[i] > 35) { x = radius + cos(radians((180+i)))*(newValue[i]); y = radius + sin(radians((180+i)))*(newValue[i]); ellipse(x, y, 10, 10); } } } /* set the radar distance rings and out put their values, 50, 100, 150 etc.. */ for (int i = 0; i <=6; i++){ noFill(); strokeWeight(1); stroke(0, 255-(30*i), 0); ellipse(radius, radius, (100*i), (100*i)); fill(0, 100, 0); noStroke(); text(Integer.toString(radarDist+50), 380, (305-radarDist), 50, 50); radarDist+=50; } radarDist = 0; /* draw the grid lines on the radar every 30 degrees and write their values 180, 210, 240 etc.. */ for (int i = 0; i <= 6; i++) { strokeWeight(1); stroke(0, 55, 0); line(radius, radius, radius + cos(radians(180+(30*i)))*w, radius + sin(radians(180+(30*i)))*w); fill(0, 55, 0); noStroke(); if (180+(30*i) >= 300) { text(Integer.toString(180+(30*i)), (radius+10) + cos(radians(180+(30*i)))*(w+10), (radius+10) + sin(radians(180+(30*i)))*(w+10), 25,50); } else { text(Integer.toString(180+(30*i)), radius + cos(radians(180+(30*i)))*w, radius + sin(radians(180+(30*i)))*w, 60,40); } } /* Write information text and values. */ noStroke(); fill(0); rect(350,402,800,100); fill(0, 100, 0); text("Grados: "+Integer.toString(degree), 100, 380, 100, 50); // use Integet.toString to convert numeric to string as text() only outputs strings text("Distancia: "+Integer.toString(value), 100, 400, 100, 50); // text(string, x, y, width, height) text("tuelectronica.es", 540, 380, 250, 50); fill(0); rect(70,60,150,100); fill(0, 100, 0); text("Screen Key:", 100, 50, 150, 50); fill(0,50,0); rect(30,53,10,10); text("Primer barrido", 115, 70, 150, 50); fill(0,110,0); rect(30,73,10,10); text("Segundo barrido", 115, 90, 150, 50); fill(0,170,0); rect(30,93,10,10); text("Promedio", 115, 110, 150, 50); noFill(); stroke(150,0,0); strokeWeight(1); ellipse(29, 113, 10, 10); fill(150,0,0); text("Movimiento", 115, 130, 150, 50); } /* get values from serial port */ void serialEvent (Serial myPort) { String xString = myPort.readStringUntil(lf); // read the serial port until a new line if (xString != null) { // if theres data in between the new lines xString = trim(xString); // get rid of any whitespace just in case String getX = xString.substring(1, xString.indexOf("V")); // get the value of the servo position String getV = xString.substring(xString.indexOf("V")+1, xString.length()); // get the value of the sensor reading degree = Integer.parseInt(getX); // set the values to variables value = Integer.parseInt(getV); oldValue[degree] = newValue[degree]; // store the values in the arrays. newValue[degree] = value; /* sets a counter to allow for the first 2 sweeps of the servo */ firstRun++; if (firstRun > 360) { firstRun = 360; // keep the value at 360 } } }


Tas una comparación cada dos barridos, el programa marca con circunferencias rojas donde existen diferencias de medidas respecto al barrido anterior.
Si el programa nos genera un error en la línea:
myPort = new Serial(this, Serial.list()[1], 9600);
el problema puede deberse a que se está intentando leer un puerto serie que no existe.
En la ventana de notificaciones de Processing debe aparecer algo como esto:

Esto es un listado de los puertos serie que tiene nuestro PC, debemos usar de la lista el que Arduino nos genera, por defecto suele ser COM3, pero verifícalo antes. Para usar el puerto serie adecuado solo tenemos que poner el índice numérico que aparece junto a él en la función Serial.list()[1] que está en la línea donde nos genera el error.
Es posible también que no se nos genere un error, pero el puerto serie no sea el correcto. Si el programa no funciona, puede ser esta la causa.
Este programa ha sido testado en la versión Processing 2.0b8 de Windows.

